- Messages
- 3,649
- Reaction score
- 6,985
- Points
- 8,300
- Salty Doubloons
- 3,772
“Like a Shadow, I am and I am not”
Personal Information
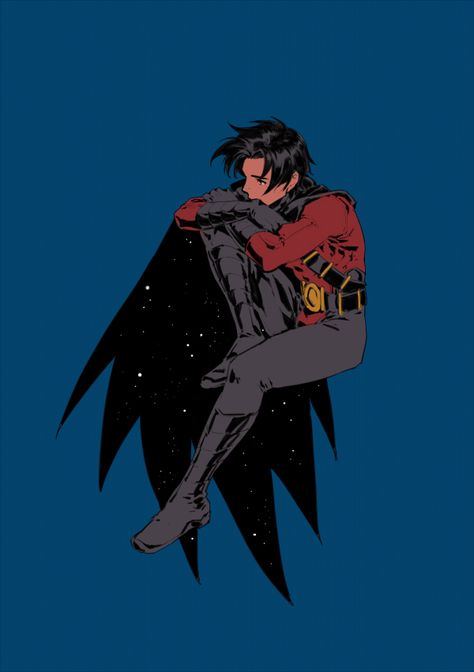
Name: Akira Takeuchi/"Kage"
Epithet: Grim Reaper's Shadow (死神の影)
Alias: Kurai
Bounty:
 2,375,000,000 (Total):
1,125,000,000 (As Kurai)
1,250,000,000 (As Raven)
Total Bounty:
Age: 19
Gender: Male
Height: 184 cm
Weight: 60 kg
Organization: Spada Pirates
Role: Assassin
Berī: 39,878,625,000
DC: 10
Epithet: Grim Reaper's Shadow (死神の影)
Alias: Kurai
Bounty:
Total Bounty:
Age: 19
Gender: Male
Height: 184 cm
Weight: 60 kg
Organization: Spada Pirates
Role: Assassin
Berī: 39,878,625,000
DC: 10
Personality and History
Very little is known about Akira in his childhood, he is known to be a rather quiet individual, and an orphan living in an orphanage dojo on an island in North Blue up till the age of 13. A combat prodigy since young, outside of the basics taught by the orphanage, Akira started to develop his own fighting style during his time in the dojo. At the age of 14 however, his island was attacked by the Spada Pirates.
During the invasion, in his own self-defense, Akira was able to kill a couple of the Spada Pirates by stabbing them from the back with weapons dropped on the ground during the attack. However before long, the local militia and villagers surrendered to the pirates. The Grim Reaper, perhaps mildly interested in Akira’s potential decided that he was to be given an ultimatum, die along with the villagers or to join them. And as a test of loyalty, she gave Akira a katana and told him to kill the villagers if he wants to live. Due to his young age, the combination of wanting to survive, cries of the villagers and the mocking laughs of the pirates – pressure broke Akira and before long, the young child saw blood, splattered on his face and on the sword that was given.
In a blank state of mind, the only thing he could remember at that time was the laughs of the pirates. Afterwards, not much is known about the village – though it is presumably completely razed to the ground and those that did not escape the attack are likely slaughtered. Years later, the Spada Pirates came up with an idea, to start a legend about Isis, the Grim Reaper. And the core part of this plan is Akira, whom now known only as ‘Kage’, a loyal pawn of the Spada Pirates, now stoic and cold-hearted. A legend to tell the tales of those who goes against the Grim Reaper will be killed by her shadow. A myth to scare the enemies of Spada Pirates and create fear within the world.
Rise of the Spada Pirates Saga
Appearance
In Haela Isles, the first known appearance of the Shadow of La Spada arrived in the small kingdom of Migard. Originally less of doing work for La Spada and more of a personal adventure with the rumors of the Revolutionary Army. Akira fell prey to a witch's deceit as he learns about the curse that struck Haela Isles. Upon discovering the truth about the curse, a young boy whom possessed the mythical Zoan, Fenrir - Akira decided to help the boy confront his past and his father, King Ran. Defeating the initial group of Revolutionaries, Akira forced a female Revolutionary Officer by the name of Kath to work for him. This eventually led to a brutal battle between Akira and the army of Migard and their defeat, as well as the defeat of the remaining Revolutionaries stationed on the island. However, wanting to keep his identity hidden - Kath is allowed put Haela Isle under the her banner - whilst secretly controlled by Spada Pirates.
Here, the first rumor about the Shadow of La Spada that would came and eliminate the enemies of the Grim Reaper came to be.
Wano Kuni Arc
Months later, the Spada Pirates have decided to take down Kaido and his Beast Pirates - upon hearing of the news of a severe drought in Wano Kuni, Akira and La Spada have took the opportunity to defeat the Yonko. Entering the country through the Koi Waterfall, the Spada Pirates made landfall in the Flower Capital. Battling for control with La Spada against King of the Beast Pirates, they eventually forced the Zoan user to retreat which is quickly usurped by the Spada Pirates. Scouting the Flower Capital, Akira eventually come face to face with Kallavan and Orochi, prompting a short battle alongside La Spada before Kaido arrived alongside the Gambit of the Vampirates.
Soon after, Akira left to continue to seek out Orochi - planned to eliminate the Beast Pirates and their influence one by one, tracking the man into a forest. Here, Akira eventually located the man - though with a false promise to head to Onigashima where the Beast Pirates are, Akira and Orochi took the ship heading into Onigashima offshore. With the arrival of Black Maria however, Orochi was saved which led to a battle with Black Maria. Through a series of dangerous exchanges between both of them leading to the sinking of the ship, Akira managed to surprise Black Maria before she could escape the sinking ship back to her own, getting ahead of her using her mistakenly thrown weapon to jump past her, cutting her own web as well to cause Black Maria to fell into the sea whilst safely landing on the other ship where Orochi is. Here Orochi and Akira finally reached the shores of Onigashima and where King and Sasaki would be seen in combat.
From here Akira would once more engage in combat, this time with King and Sasaki in a three-way battle, though not before taking out Orochi and his ship to prevent his escape. Here a three-way deadlock would continue for sometime until the arrival of Black Maria would prompt Sasaki away, leaving King and Akira to their duel. The ensuing battle becomes much more dangerous for Akira as the Zoan user would start to overwhelm Akira with blazing attacks. Ultimately however, the combined damage from each other by each other from the start to finish leads to the final moment in battle, where Akira utilizes a powerful technique, Tranquility to cut down King, ending the battle.
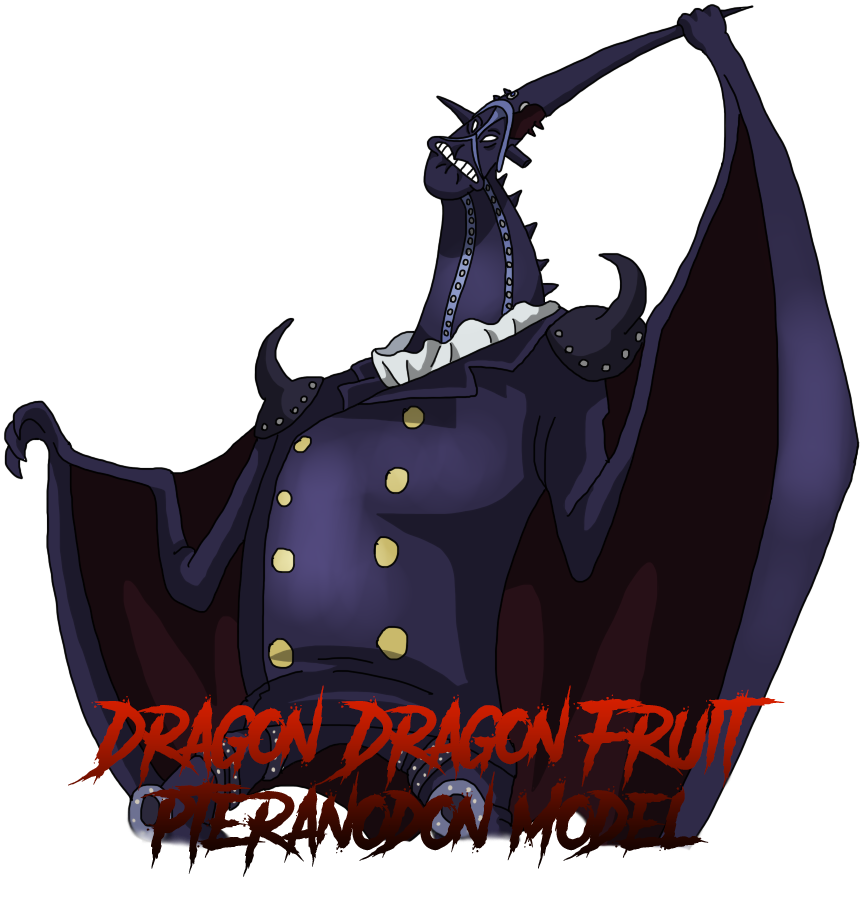
With King dead and Orochi still barely alive. Fighting Sasaki became not an option, but enough to cruelly end the life of Orochi. Leaving Sasaki be, Akira took the heads of King and Orochi to be presented to La Spada inside Onigashima. With the battle at the top concluded, Akira impressed La Spada with the heads of King and Orochi, as well as the death of Queen - the Vampirates and Spada Pirates entered a trade, Queen for Raid Suit technology, granting Spada Pirates new technology to play with and utilize to their goals. With this, La Spada would declare the need to pursue Big Mom soon in Whole Cake Island. Soon afterwards, as reward for eliminating King - Akira consumed the Ryu Ryu no Mi; Model: Pteranodon.
Intermission
After the events of Wano Kuni, Akira followed the clues of his sword, Muramasa - a Saijio O Wazamono into the Valley of Peace, where he met with Oogway, or rather the spirit of Oogway. Here the tortoise reveal several hints of himself, the prophecy and the origins of the sword. When Oogway fades out of the world, Akira encountered a pack of wolves whom are fanatics of Muramasa, though upon defeating them - the wolves submit themselves to Akira, or at least for the time being. As Akira ordered them to bring them to the prison palace up north of the island - Akira came travelled with them up north into until they came within range of the prison palace, covered by ruins. Surrounding the palace are World Government personnel which Akira took the role of a bait and fought them whilst allowing the wolves prepare to enter the prison, while distracting the Marines, Akira killed Rear Admiral Croc as well as several men before he would escape into the tunnels undetected, allowing them free access into the prison palance itself. Within the tunnels, Akira found depictions of his past though not being able to understand how and why led him to consider a similar situation in the valley in the past and put forth his initial thoughts behind his head.
However, upon discovering the intentions of the wolves which is to release their leaders - Akira however did nothing, as a Pirate he would only consider his own objectives. This led to him entering the Spirit Realm alone after a strange calling. Within the Spirit Realm, Akira encountered Kai and the petrified masters including Oogway, though Kai would eventually disappear after a failed attempt to even touch Kai due to his corporal form - leading Akira to follow him out just minutes after. Unknowingly, Akira has accidentally cause the all prisoners to be released and a few weeks have past since he entered the Spirit Realm after meeting with one of the Rhinos guarding the prison, Vachnir. Understanding his mistake, Akira told the Rhino to gather and find a way to stop Tai Lung, the supposed leader in charge of the wolves. Escaping the prison with Vachnir, the Rhinos started to gather themselves and head to Jade Palace while Akira flew towards the Jade Palace alone with his Zoan form. Upon reaching the Jade Palace, Akira saved the five masters and defeated Shen, though not before taking some damage in the process due to Shen's trickery, or rather his own form of Martial Arts. Afterwards, Akira would head into the palace itself where he would find Shifu - leading to a brief talk in regards to the prophecy and the origin of the swords, Muramasa and Twilight's Edge. Helping Shifu out of the palace for help before returning to the portal that would lead back to the Spirit Realm, there the final battle awaits.
Meeting Tai Lung, Akira would the Mink - taking damages though after a short period of time eventually led Tai Lung into an opening where Akira would struck Tai Lung, almost killing the Mink but not before clashing Twilight's Edge against Akira's Muramasa, allowing Kai to reappear from the clash of the swords. Here Kai would heal Tai Lung, preventing Akira from eliminating him to prevent a numerical advantage against the boy. Talking to Kai however revealed more on the prophecy. Po's appearance would force Tai Lung to deal with the panda, allowing Akira to fight Kai alone. The fight against Kai is difficult however, as the inability to hurt Kai once again allowed Kai to injure Akira rather easily though his powerful Electro abilities. However, after thinking through the words of many such as Oogway, Shifu and even Kai himself. Akira came to a conclusion. That the wielders of the swords is reverse, especially having seen the strange interaction with Twilight's Edge and Kai as well as the sense of familiarity. This led to Akira baiting Kai into striking Akira directly with Twilight's Edge, which prompts Akira to let go of Muramasa and call for Twilight's Edge instead - resulting in Twilight's Edge no longer listening to Kai and even resist him in which he would be forced to drop the sword. As Akira picks up Twilight's Edge, Kai in his shock would have no choice to pick up Muramasa, especially upon hearing Akira's own interpretation of the prophecy. As Akira aims to take down Kai as quickly as possible, using a powerful sword technique - Muramasa suddenly resisted Kai as well, allowing Akira to defeat him.
As Kai laid in defeat, he would ask if Akira knew who is the true owner of Muramasa, leading to the boy's realization of the sword's origin, or rather from his own memories. La Spada gave him the sword. This would meant that La Spada is the wielder of Muramasa and Akira is the wielder of Twilight's Edge. However, Oogway's appearance and his own answers to Akira's questioning would reveal Akira's ability to wield both blades, and thus leads to the question that many has asked of him. Whose soul would he follow? With more revelations to the prophecy, Akira decided on his final answer and choose Twilight's Edge, later handing Muramasa back to Gabriel whom would later appear - seemly well aware of what is going on and has predicted Akira's choices. Gabriel would ask of the boy to slay the Grim Reaper, telling him of La Spada's weakness and strength. However, such words remain to be confusing or not fully understood by what they truly meant. With the help of Shifu and the Masters, the Valley has a new rumor, using the identity of Raven to help quell civil wars and protect the island from invaders - a symbol of fear and power for the benefit of the Valley.
Weeks after dangerous turns of events in Valley of Peace, Akira sought out Mihawk in Kuraigana Island - wanting to prove himself against the Greatest Swordsman. After a long battle against Mihawk - showcasing their skills and prowess against each other, a suggestion by Mihawk turns the battle into one of pure swordsmanship - a duel not to the death but of their skills. Two bokens, two swordsman. The first to strike the other three times would win. Yet, the conclusion of the duel would quickly come to a close end as Mihawk would defeat Akira in the duel with a score of 3-2. Despite defeated, having gain new insight and skill in the duel against Mihawk, a promise is made between the both of them that once Akira is about to achieve his goal, they would settle the score once more.
The duel to be the Greatest Swordsman.
Whole Cake Island Arc
Right after the duel with Mihawk in Kuraigana, Akira was immediately sent back to the New World with La Spada, this time continuing their pursuit over Big Mom in Whole Cake Island. Poised to take down the members of Big Mom Pirates, Akira and La Spada spitted up to gain control of territories from Big Mom while searching for their poneglyph as Akira made his way towards Biscuit Island where he would encounter Charlotte Opera, a small encounter that would quickly result in his death - prompting Akira to drag the body of Opera onwards into the island. Here, Akira once again encountered another of their crew member, this time Charlotte Cracker. A tedious fight between Akira and Cracker would ensue, leading to almost a stalemate as Akira found difficulties finding the real Cracker in the middle of the armies of biscuits that Cracker continuously summon as an obstacle. However, the battle would soon turn for the worst as Charlotte Katakuri arrives to help Cracker as well, showing teamwork as brothers to deal with Akira. Yet, the boy having extremely powerful abilities managed to temporarily separate Cracker and Katakuri with Apex Storm, generating tornadoes around the area. This allowed Akira to eliminate Cracker whilst they are distracted with the powerful tornadoes, killing one more member of Big Mom.
Afterwards, the battle with Katakuri and Akira continues - with the awakening of his paramecia being enough to gave tremendous difficulties to Akira, the two combatants were trading blows for blows, though with Twilight's Edge lost temporarily, Akira was forced to fight with only his Zoan powers. However, soon afterwards after a long drawn out battle, more members of Big Mom Pirates would arrive, alongside their allies, the Beast Pirates. Overwhelmed with numerical disadvantage, the boy managed to escape though not before picking up Twilight's Edge. Escaping to another island, injured - Akira came face to face with Bartholomew Kuma whom came to offer him advice on his goals - the Poneglyph, where his answers towards his goals would be realized. Left with an incredible opportunity, Akira eventually took the warlord's help and was sent towards Whole Cake Island itself, where the Chateau is.
Once Akira arrives at the chateau, he would began searching for the Poneglyph, encountering Sasaki once more in the process. Forced into battle due to their differences, the battle to extract the truth from Akira began. Which would eventually lead to his defeat, forcing truth out of his mouth. With knowledge of Akira's past and goal, Sasaki proposed a temporary truce - to look for Poneglyph together. For the poneglyph became an important goal for the boy, he readily accepted the truce. Heading straight to treasure room where the poneglyph is, the two encountered Big Mom Pirates and the Beast Pirates once more though this time Katakuri laid unconscious from the previous battle. Left to his own devices immediately by Sasaki, Akira fought the remaining Big Mom Pirates alone. This time without Katakuri around, Akira made short work of the Big Mom Pirates, defeating several of their family that would eventually lead to the despair of the crew. Faced with defeat from the young boy, Akira told the Big Mom Pirates to leave Whole Cake Island, for La Spada would hunt them down before walking away.
With the Beast Pirates however, Akira gave them an ultimatum as well - join him as allies and go back to Wano Kuni to protect the people back there, or they too would eventually be hunted down by others. Yet similarly Akira did not wait for an immediate response, giving them the flag of Spada Pirates should they decide to accept Akira's invitation. Heading towards the back of the treasure room, Akira's goal is finally in sight, the poneglyph. However, he would quickly find it to be disappointing - as Akira is not able to read it, and similarly according to Sasaki neither does he. Though the boy was suspicious of his answer, Akira did not pursue further - understanding that it is unlikely for him to receive an answer even if by miracle he would defeat Sasaki. As the battles above finally conclude with the downfall of Kaido and Big Mom, Akira would eventually return to La Spada, with news of the defeat of Big Mom Pirates, the possible alliance with the Beast Pirates and finally, the poneglyph.
However, things did not gone fully as planned as Sasaki would end the truce between them by trying to take down La Spada at her weakest. Prompting Akira to defend her to the shock of the Marine. Not only that, La Spada's shrewd nature would eventually force Sasaki to make the choice of continue fighting or risk losing Kallavan, prompting the marine to retreat shortly afterwards. With all their enemies gone, La Spada would finally make a broadcast to the world. However, in a shocking twist - Akira betrayed La Spada.
Cutting down La Spada in the middle of the broadcast as it eventually gets cut off, preventing any from realizing who it could be without an identity. La Spada was finally defeated. Yet after only moments of her 'death', La Spada however revived immediately. Shocked. Akira was not able to comprehend how it could happened, but with his failure to eliminate La Spada at her height of her arrogance and confidence, the point of which her guard is at the absolute lowest. A fight betwen La Spada and Akira would began and end, with the defeat of the Shadow.
Intermission - Wano
After the defeat of Akira, La Spada sent the young boy back to Wano - imprisoned in Udon. Although specifics of why Akira is imprisoned is not known to the rest of the Spada Pirates, it is however merely implied that Akira failed to achieve their objectives in Whole Cake Island is what that is known by the crew.
TBD
Sovereign War Arc
Fron Island
TBD
Post Time Skip Arc
Appearance
Future...
During the invasion, in his own self-defense, Akira was able to kill a couple of the Spada Pirates by stabbing them from the back with weapons dropped on the ground during the attack. However before long, the local militia and villagers surrendered to the pirates. The Grim Reaper, perhaps mildly interested in Akira’s potential decided that he was to be given an ultimatum, die along with the villagers or to join them. And as a test of loyalty, she gave Akira a katana and told him to kill the villagers if he wants to live. Due to his young age, the combination of wanting to survive, cries of the villagers and the mocking laughs of the pirates – pressure broke Akira and before long, the young child saw blood, splattered on his face and on the sword that was given.
In a blank state of mind, the only thing he could remember at that time was the laughs of the pirates. Afterwards, not much is known about the village – though it is presumably completely razed to the ground and those that did not escape the attack are likely slaughtered. Years later, the Spada Pirates came up with an idea, to start a legend about Isis, the Grim Reaper. And the core part of this plan is Akira, whom now known only as ‘Kage’, a loyal pawn of the Spada Pirates, now stoic and cold-hearted. A legend to tell the tales of those who goes against the Grim Reaper will be killed by her shadow. A myth to scare the enemies of Spada Pirates and create fear within the world.
Rise of the Spada Pirates Saga
Appearance
In Haela Isles, the first known appearance of the Shadow of La Spada arrived in the small kingdom of Migard. Originally less of doing work for La Spada and more of a personal adventure with the rumors of the Revolutionary Army. Akira fell prey to a witch's deceit as he learns about the curse that struck Haela Isles. Upon discovering the truth about the curse, a young boy whom possessed the mythical Zoan, Fenrir - Akira decided to help the boy confront his past and his father, King Ran. Defeating the initial group of Revolutionaries, Akira forced a female Revolutionary Officer by the name of Kath to work for him. This eventually led to a brutal battle between Akira and the army of Migard and their defeat, as well as the defeat of the remaining Revolutionaries stationed on the island. However, wanting to keep his identity hidden - Kath is allowed put Haela Isle under the her banner - whilst secretly controlled by Spada Pirates.
Here, the first rumor about the Shadow of La Spada that would came and eliminate the enemies of the Grim Reaper came to be.
Wano Kuni Arc
Months later, the Spada Pirates have decided to take down Kaido and his Beast Pirates - upon hearing of the news of a severe drought in Wano Kuni, Akira and La Spada have took the opportunity to defeat the Yonko. Entering the country through the Koi Waterfall, the Spada Pirates made landfall in the Flower Capital. Battling for control with La Spada against King of the Beast Pirates, they eventually forced the Zoan user to retreat which is quickly usurped by the Spada Pirates. Scouting the Flower Capital, Akira eventually come face to face with Kallavan and Orochi, prompting a short battle alongside La Spada before Kaido arrived alongside the Gambit of the Vampirates.
Soon after, Akira left to continue to seek out Orochi - planned to eliminate the Beast Pirates and their influence one by one, tracking the man into a forest. Here, Akira eventually located the man - though with a false promise to head to Onigashima where the Beast Pirates are, Akira and Orochi took the ship heading into Onigashima offshore. With the arrival of Black Maria however, Orochi was saved which led to a battle with Black Maria. Through a series of dangerous exchanges between both of them leading to the sinking of the ship, Akira managed to surprise Black Maria before she could escape the sinking ship back to her own, getting ahead of her using her mistakenly thrown weapon to jump past her, cutting her own web as well to cause Black Maria to fell into the sea whilst safely landing on the other ship where Orochi is. Here Orochi and Akira finally reached the shores of Onigashima and where King and Sasaki would be seen in combat.
From here Akira would once more engage in combat, this time with King and Sasaki in a three-way battle, though not before taking out Orochi and his ship to prevent his escape. Here a three-way deadlock would continue for sometime until the arrival of Black Maria would prompt Sasaki away, leaving King and Akira to their duel. The ensuing battle becomes much more dangerous for Akira as the Zoan user would start to overwhelm Akira with blazing attacks. Ultimately however, the combined damage from each other by each other from the start to finish leads to the final moment in battle, where Akira utilizes a powerful technique, Tranquility to cut down King, ending the battle.
With King dead and Orochi still barely alive. Fighting Sasaki became not an option, but enough to cruelly end the life of Orochi. Leaving Sasaki be, Akira took the heads of King and Orochi to be presented to La Spada inside Onigashima. With the battle at the top concluded, Akira impressed La Spada with the heads of King and Orochi, as well as the death of Queen - the Vampirates and Spada Pirates entered a trade, Queen for Raid Suit technology, granting Spada Pirates new technology to play with and utilize to their goals. With this, La Spada would declare the need to pursue Big Mom soon in Whole Cake Island. Soon afterwards, as reward for eliminating King - Akira consumed the Ryu Ryu no Mi; Model: Pteranodon.
Intermission
After the events of Wano Kuni, Akira followed the clues of his sword, Muramasa - a Saijio O Wazamono into the Valley of Peace, where he met with Oogway, or rather the spirit of Oogway. Here the tortoise reveal several hints of himself, the prophecy and the origins of the sword. When Oogway fades out of the world, Akira encountered a pack of wolves whom are fanatics of Muramasa, though upon defeating them - the wolves submit themselves to Akira, or at least for the time being. As Akira ordered them to bring them to the prison palace up north of the island - Akira came travelled with them up north into until they came within range of the prison palace, covered by ruins. Surrounding the palace are World Government personnel which Akira took the role of a bait and fought them whilst allowing the wolves prepare to enter the prison, while distracting the Marines, Akira killed Rear Admiral Croc as well as several men before he would escape into the tunnels undetected, allowing them free access into the prison palance itself. Within the tunnels, Akira found depictions of his past though not being able to understand how and why led him to consider a similar situation in the valley in the past and put forth his initial thoughts behind his head.
However, upon discovering the intentions of the wolves which is to release their leaders - Akira however did nothing, as a Pirate he would only consider his own objectives. This led to him entering the Spirit Realm alone after a strange calling. Within the Spirit Realm, Akira encountered Kai and the petrified masters including Oogway, though Kai would eventually disappear after a failed attempt to even touch Kai due to his corporal form - leading Akira to follow him out just minutes after. Unknowingly, Akira has accidentally cause the all prisoners to be released and a few weeks have past since he entered the Spirit Realm after meeting with one of the Rhinos guarding the prison, Vachnir. Understanding his mistake, Akira told the Rhino to gather and find a way to stop Tai Lung, the supposed leader in charge of the wolves. Escaping the prison with Vachnir, the Rhinos started to gather themselves and head to Jade Palace while Akira flew towards the Jade Palace alone with his Zoan form. Upon reaching the Jade Palace, Akira saved the five masters and defeated Shen, though not before taking some damage in the process due to Shen's trickery, or rather his own form of Martial Arts. Afterwards, Akira would head into the palace itself where he would find Shifu - leading to a brief talk in regards to the prophecy and the origin of the swords, Muramasa and Twilight's Edge. Helping Shifu out of the palace for help before returning to the portal that would lead back to the Spirit Realm, there the final battle awaits.
Meeting Tai Lung, Akira would the Mink - taking damages though after a short period of time eventually led Tai Lung into an opening where Akira would struck Tai Lung, almost killing the Mink but not before clashing Twilight's Edge against Akira's Muramasa, allowing Kai to reappear from the clash of the swords. Here Kai would heal Tai Lung, preventing Akira from eliminating him to prevent a numerical advantage against the boy. Talking to Kai however revealed more on the prophecy. Po's appearance would force Tai Lung to deal with the panda, allowing Akira to fight Kai alone. The fight against Kai is difficult however, as the inability to hurt Kai once again allowed Kai to injure Akira rather easily though his powerful Electro abilities. However, after thinking through the words of many such as Oogway, Shifu and even Kai himself. Akira came to a conclusion. That the wielders of the swords is reverse, especially having seen the strange interaction with Twilight's Edge and Kai as well as the sense of familiarity. This led to Akira baiting Kai into striking Akira directly with Twilight's Edge, which prompts Akira to let go of Muramasa and call for Twilight's Edge instead - resulting in Twilight's Edge no longer listening to Kai and even resist him in which he would be forced to drop the sword. As Akira picks up Twilight's Edge, Kai in his shock would have no choice to pick up Muramasa, especially upon hearing Akira's own interpretation of the prophecy. As Akira aims to take down Kai as quickly as possible, using a powerful sword technique - Muramasa suddenly resisted Kai as well, allowing Akira to defeat him.
As Kai laid in defeat, he would ask if Akira knew who is the true owner of Muramasa, leading to the boy's realization of the sword's origin, or rather from his own memories. La Spada gave him the sword. This would meant that La Spada is the wielder of Muramasa and Akira is the wielder of Twilight's Edge. However, Oogway's appearance and his own answers to Akira's questioning would reveal Akira's ability to wield both blades, and thus leads to the question that many has asked of him. Whose soul would he follow? With more revelations to the prophecy, Akira decided on his final answer and choose Twilight's Edge, later handing Muramasa back to Gabriel whom would later appear - seemly well aware of what is going on and has predicted Akira's choices. Gabriel would ask of the boy to slay the Grim Reaper, telling him of La Spada's weakness and strength. However, such words remain to be confusing or not fully understood by what they truly meant. With the help of Shifu and the Masters, the Valley has a new rumor, using the identity of Raven to help quell civil wars and protect the island from invaders - a symbol of fear and power for the benefit of the Valley.
Weeks after dangerous turns of events in Valley of Peace, Akira sought out Mihawk in Kuraigana Island - wanting to prove himself against the Greatest Swordsman. After a long battle against Mihawk - showcasing their skills and prowess against each other, a suggestion by Mihawk turns the battle into one of pure swordsmanship - a duel not to the death but of their skills. Two bokens, two swordsman. The first to strike the other three times would win. Yet, the conclusion of the duel would quickly come to a close end as Mihawk would defeat Akira in the duel with a score of 3-2. Despite defeated, having gain new insight and skill in the duel against Mihawk, a promise is made between the both of them that once Akira is about to achieve his goal, they would settle the score once more.
The duel to be the Greatest Swordsman.
Whole Cake Island Arc
Right after the duel with Mihawk in Kuraigana, Akira was immediately sent back to the New World with La Spada, this time continuing their pursuit over Big Mom in Whole Cake Island. Poised to take down the members of Big Mom Pirates, Akira and La Spada spitted up to gain control of territories from Big Mom while searching for their poneglyph as Akira made his way towards Biscuit Island where he would encounter Charlotte Opera, a small encounter that would quickly result in his death - prompting Akira to drag the body of Opera onwards into the island. Here, Akira once again encountered another of their crew member, this time Charlotte Cracker. A tedious fight between Akira and Cracker would ensue, leading to almost a stalemate as Akira found difficulties finding the real Cracker in the middle of the armies of biscuits that Cracker continuously summon as an obstacle. However, the battle would soon turn for the worst as Charlotte Katakuri arrives to help Cracker as well, showing teamwork as brothers to deal with Akira. Yet, the boy having extremely powerful abilities managed to temporarily separate Cracker and Katakuri with Apex Storm, generating tornadoes around the area. This allowed Akira to eliminate Cracker whilst they are distracted with the powerful tornadoes, killing one more member of Big Mom.
Afterwards, the battle with Katakuri and Akira continues - with the awakening of his paramecia being enough to gave tremendous difficulties to Akira, the two combatants were trading blows for blows, though with Twilight's Edge lost temporarily, Akira was forced to fight with only his Zoan powers. However, soon afterwards after a long drawn out battle, more members of Big Mom Pirates would arrive, alongside their allies, the Beast Pirates. Overwhelmed with numerical disadvantage, the boy managed to escape though not before picking up Twilight's Edge. Escaping to another island, injured - Akira came face to face with Bartholomew Kuma whom came to offer him advice on his goals - the Poneglyph, where his answers towards his goals would be realized. Left with an incredible opportunity, Akira eventually took the warlord's help and was sent towards Whole Cake Island itself, where the Chateau is.
Once Akira arrives at the chateau, he would began searching for the Poneglyph, encountering Sasaki once more in the process. Forced into battle due to their differences, the battle to extract the truth from Akira began. Which would eventually lead to his defeat, forcing truth out of his mouth. With knowledge of Akira's past and goal, Sasaki proposed a temporary truce - to look for Poneglyph together. For the poneglyph became an important goal for the boy, he readily accepted the truce. Heading straight to treasure room where the poneglyph is, the two encountered Big Mom Pirates and the Beast Pirates once more though this time Katakuri laid unconscious from the previous battle. Left to his own devices immediately by Sasaki, Akira fought the remaining Big Mom Pirates alone. This time without Katakuri around, Akira made short work of the Big Mom Pirates, defeating several of their family that would eventually lead to the despair of the crew. Faced with defeat from the young boy, Akira told the Big Mom Pirates to leave Whole Cake Island, for La Spada would hunt them down before walking away.
With the Beast Pirates however, Akira gave them an ultimatum as well - join him as allies and go back to Wano Kuni to protect the people back there, or they too would eventually be hunted down by others. Yet similarly Akira did not wait for an immediate response, giving them the flag of Spada Pirates should they decide to accept Akira's invitation. Heading towards the back of the treasure room, Akira's goal is finally in sight, the poneglyph. However, he would quickly find it to be disappointing - as Akira is not able to read it, and similarly according to Sasaki neither does he. Though the boy was suspicious of his answer, Akira did not pursue further - understanding that it is unlikely for him to receive an answer even if by miracle he would defeat Sasaki. As the battles above finally conclude with the downfall of Kaido and Big Mom, Akira would eventually return to La Spada, with news of the defeat of Big Mom Pirates, the possible alliance with the Beast Pirates and finally, the poneglyph.
However, things did not gone fully as planned as Sasaki would end the truce between them by trying to take down La Spada at her weakest. Prompting Akira to defend her to the shock of the Marine. Not only that, La Spada's shrewd nature would eventually force Sasaki to make the choice of continue fighting or risk losing Kallavan, prompting the marine to retreat shortly afterwards. With all their enemies gone, La Spada would finally make a broadcast to the world. However, in a shocking twist - Akira betrayed La Spada.
Cutting down La Spada in the middle of the broadcast as it eventually gets cut off, preventing any from realizing who it could be without an identity. La Spada was finally defeated. Yet after only moments of her 'death', La Spada however revived immediately. Shocked. Akira was not able to comprehend how it could happened, but with his failure to eliminate La Spada at her height of her arrogance and confidence, the point of which her guard is at the absolute lowest. A fight betwen La Spada and Akira would began and end, with the defeat of the Shadow.
Intermission - Wano
After the defeat of Akira, La Spada sent the young boy back to Wano - imprisoned in Udon. Although specifics of why Akira is imprisoned is not known to the rest of the Spada Pirates, it is however merely implied that Akira failed to achieve their objectives in Whole Cake Island is what that is known by the crew.
TBD
Sovereign War Arc
Fron Island
TBD
Post Time Skip Arc
Appearance
Future...
Statistics
Level 100 x 6 = 600 (Unused: 0)
Experience Points: 464,539 (Level 100: 443,349)
Race Bonus (+2 Strength/Speed/Vitality, +3 Haki per 10 level)
Martial Arts (+5 Strength, +5 Speed, +5 Vitality)
Store Boost
Devil Fruit
Strength: 80 + 20 + 5 + 20 = 105 (125)
Speed: 80 + 20 + 5 + 25 = 105 (130)
- Reaction: 105 (130)
- Movement: 105 (130)
Vitality: 80 + 20 + 5 + 25 = 105 (130)
- Durability: 105 (130)
- Stamina: 105 (130)
Martial Arts: 100
- Shuurin Shūen Ryū: 100 + 20 = 120
- Ryūsui-Ken: 100
Expertise: 30
- Seimei Kikan: 60
Haki: 70 + 30 = 100
- Busō-shoku no Haki (Offensive/Defensive): 100 + 20 = 120 [Devil's Might]
- Kenbun-shoku no Haki (Awareness/Precognition): 100 [Devil's Will]
- Haō-shoku no Haki: Advanced [Devil's Voice]
Devil Fruit: 100 + 20 = 120
Boosts: 60
- Awakening: 20
- Shuurin Shūen Ryū: 20
- Busō-shoku no Haki: 20
Perks
- Hybridised Zoan: Allows extra hybrid transformations without the use of Rumble Balls (Requires 100 in Devil Fruit) [Zoan Perk].
- Mushin (無心): Training extensively in various different martial arts, ranging from swordsmanship to hand-to-hand combat and even other supplementary styles, Akira is able to achieve a mental state described as 'Mushin'. [Martial Arts Perk]
Equipment
1) Shadow's Raid Suit (Z+ Rank) [Armor Design]:
Capsule: Black Canister
Features:
- Armor Retraction: The greaves and boots of the suit possess a hidden mechanism when activated by Akira would retract the greaves all the way up to the shoulder, and the boots would retract mid-way towards the knee. This unique mechanism is deliberately made to access Zoan forms without the need to deactivate the suit itself. A secondary mechanism that can also be activated for the greaves is instead of full retraction, the sides of the greaves retracts, allowing the alternate Hybrid form for Akira to be used.
- Smoke Emitter: The raid suit consistently generates a never-ending black smoke that that quickly dissipates after a short while, emitted from small exhaust around the suit itself. This black smoke creates a smoky-like effect to the user, giving a shadowy and ominous effect visually. Whilst the black smoke does not obscure much of the user, it may potentially make certain precise movements harder to see clearly due to the smoke color matching the color of the raid suit itself but otherwise it's use is mainly for aesthetics, which in the case of its user - to perpetuate a myth convincingly given the monstrous and unnatural visual.
- Weapon Holster: A simple feature that is created to allow Akira's sword to be holstered temporarily.
- Durability: Destroyed after a large continent level attack or 3 small continent level attacks.
2) Raven's Raid Suit (Z+ Rank) [Armor Design]
Capsule: Charcoal Gray Canister with a Black Raven Logo
Features:
- Feathered Cloak: Similar to the Assassin's Clothing, but comes with a cloak of black feathers with a hood.
- Durability: Destroyed after a large continent level attack or 3 small continent level attacks.
3) Assassin's Clothing: The original is burned away by King, but Akira managed to get another black attire to use as a back-up - as well as a secondary option when needed.
Twilight's Edge (夕暮れの縁 Yuugure no En)
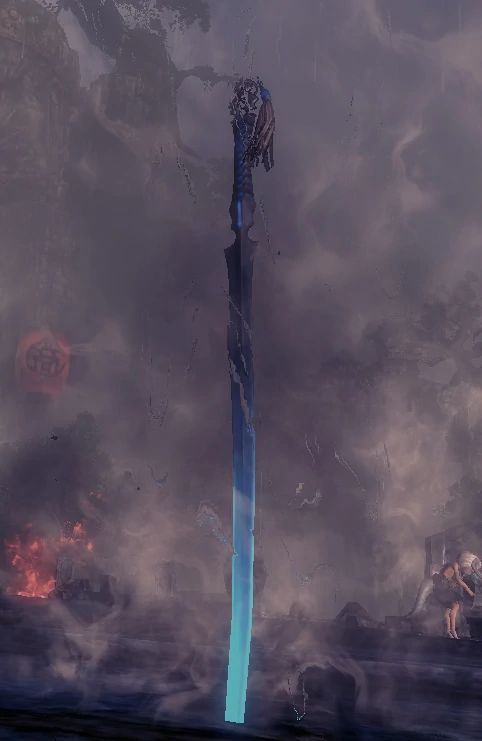
Rank: Saijō Ō Wazamono
Type: Black Blade (Applies +2 Haki DPR to non-ranged attacks passively)
Unique Feature: When imbued with Haki, the blade turns completely blue. However when a user with the King's disposition imbues it with Haki (Imbuing Conqueror's Haki is not required) it not only turns the blade blue but emits blackish-blue smoke from the blade itself, indicating the user's disposition visually.[Store Item]
History
An ancient blade located within the Valley of Peace, the sister sword of Myōhō Muramasa - another Saijō Ō Wazamono. A blade that has engage in an eternal battle against her sister sword for a millennium. Like Muramasa, Twilight's Edge, or sometimes also referred to as Yugure is not just a named meito of the greatest quality, but they housed the soul of ancient entities that refused to pass on even after their death. For Twilight's Edge, Yugure is known as the soul that housed the blade, a supposedly important figure of the Void Century. The fight between Yugure and her sister sword has created the Valley of Peace, which its land later forged Twilight's Edge and Muramasa that would eventually come to house their wills after their death. Twilight's Edge would sit upon the Valley ever since the Void Century until Oogway arrived, whom trained with Twilight's Edge alongside Muramasa, later dubbing them Apprentices.
Twilight's Edge is a powerful blade of legends, it's blue hue that gave it's name Twilight's Edge is a black blade, but despite being one continues to glow in blue instead. Some believe that it's distinctive blue blade comes from Yugure's will and soul which allows the blade to choose her wielder that would clash with Muramasa's own for eternity. Similarly to Muramasa, Twilight's Edge would later be taken out of the Valley - at one point seen in North Blue before being returned back to the Valley by Gabriel of the Spada Pirates, ultimately left in Spirit Realm before being returned to her chosen wielder once more.
Last edited: